The Homebuilt HoneyPi by Alexander

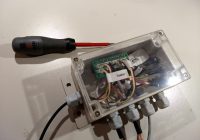
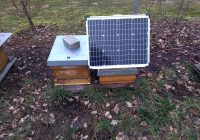
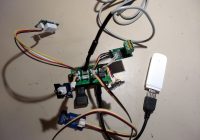
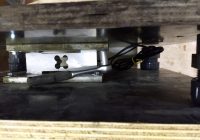
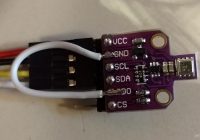
This series of articles shows a step-by-step instruction on how to build the HoneyPi using Grove connectors and all sorts of other tricks 😉 Table of contents Installation of HoneyPi in the housing Power supply 230V and solar Grove Adapter PCB Structure of the Weighing Frame Additional information on the following topics: Connection of cheap BME680 from Ebay… Read More »

Part 1: Installation of HoneyPi in a housing

type 158x90x65mm clear waterproof plastic That’s what it looks like when it’s done: Re 1: Total material costs for electronics with me approx. 64€ (+ possibly resulting forwarding expenses) Prize Amount Sum Type 15,50 € 1 15,50 € Raspi Zero reichelt Raspberry Pi Zero WH v.1.1, 1 GHz, 512 MB RAM, WLAN, BT 3,95 € 1 3,95 €… Read More »

Part 2: Power supply 230V & Solar

Power supply via 230V: The simplest and cheapest solution <10€; material for this usually already available at home: Idea for power supply in the outdoor area when 230V is available: Needed: Extension cable outdoor, price depending on length e.g. 10m 10€ Waterproof box: Richelt in red for 1,65€ or better quality in yellow for 4,50€ Mini-USB charger with… Read More »

Part 3: Adapter-LK for Grove connectors

Basics of the Grove connector system. Why Grove plugs? A table top assembly (almost) only with finished Grove modules. Solderless connector system This greatly reduces the chance of miswiring. No forgotten pull-up / pull-down resistors… A repair / component exchange extension / troubleshooting at the apiary is also much easier due to the “reverse polarity protected” plugging. If… Read More »

Part 4: Assembly of the scale frame

Here I have chosen the following structure: One screen printing plate each at the top and bottom. It is screwed onto a 100x200x10mm steel or aluminium plate for load distribution. Between the load distribution plates there is a spacer plate on each side which is adapted to the bore pattern of the load cell. At each of the… Read More »