Category Archives: component

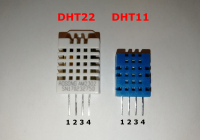
Spannungsanzeige (PCF8591)

Wird der Raspberry Pi über eine 12V Batterie mit Strom versorgt, so kann mit dem Modul PCF8591 die Spannung der Batterie gemessen werden. Das Modul kostet nur ca. 5 Euro. Dies hat den Vorteil, dass man weiß wie viel Spannung in der Batterie verbleibt. Außerdem kann man auch die Eingangsspannung des Solarpanels damit messen. Der PCF8591 verwendet, wie… Read More »

4x Half Bridge load cells

This article shows the wiring of cheaper “half bridge load cells” (YZC-161E). Such half bridge weight sensors are available on Ebay partly even together with a HX711 for only 9€. On Amazon they cost about 13€ ? Quality At constant temperatures, these sensors work okay, but these cheap sensors show a so-called temperature drift. This means that the… Read More »

Building a scale frame

Many beekeepers see the greatest challenge in the construction of the beehive’s weighing frame. As our picture gallery shows, there are many racks suitable for reproduction. In addition, our Facebook group also allows an exchange/trade among each other. In this article I would like to introduce the possibility to build your own scale rack. Otherwise there is the… Read More »

Time and energy management with Witty Pi (optional)

As of version “v0.1.1” of the firmware, the software for the “Witty Pi Mini” module is already pre-installed. You can connect this module to the Raspberry Pi – but you don’t have to. Since it is actually quite clever and can be saved especially in the winter months additional energy, we have supported this module obviously. You can… Read More »

LED (optional)

Is the HoneyPi and measuring mode or in maintenance mode? An LED light integrated in the housing can provide information about this. The light signals when switching between maintenance and measurement. The pre-installed green LED on the Raspberry Pi indicates the following: Function LED maintenance mode (“HoneyPi”-WiFi avaiable) ? lights up measuring mode ⚫ does not light up… Read More »

Calibrating load cells

Different load cells can be connected to the architecture selected by us. For this reason, it is possible to store a calibration for each connected scale in the maintenance mode. Since version v1.0 a guided calibration mode has been introduced. This simplifies calibration so that the text below is no longer necessary. The calibration consists of two values.… Read More »

Shopping list

The parts list is intended for one beehive. However, further sensors can be connected flexibly. The connected sensors can then be configured in maintenance mode. Plug n’ Play and optional upgradeabilityNot all sensors need to be purchased and connected! These can be added at any time. The system also runs if, for example, only one temperature sensor is… Read More »

Autonomous power supply at the apiary

Normally there is no power supply at the apiary, therefore this article is dedicated to the autonomous power supply of the Raspberry Pis (RPi). The Raspberry Pi 3 B needs 5.1V and 3A as optimal input voltage. Compared to other boards like the Arduino or the ESP8266 this is a lot. Nevertheless such a power supply can be… Read More »

A/D converter (HX711)

An A/D converter is required for the weight sensors (load cells). Unlike other boards, such as the Arduino or the ESP32, the Raspberry Pi has no integrated A/D converter. An A/D converter converts the analog signal into digital values. Therefore we need this 3 Euro component for the Raspberry Pi. Number of load cells per Raspberry Pi The… Read More »

Load cells

Good load cells can also be taken from personal scales or kitchen scales. One example is the kitchen scale “IDEENWELT digitale Küchenwaage” from Rossmann, which has a capacity of only 5kg and therefore too small. A bee colony should be able to measure a range between 50-150kg (depending on the weight of the hive). The article Rebuild platform… Read More »