This article shows how you can easily receive push notifications from your smartphone using the HoneyPi Android app and ThingSpeak. You can configure which ThingSpeak channels and fields you want to receive notifications for and under what conditions. This allows you to react quickly when you receive a notification that the hive’s weight is higher or lower than certain values, for example.
Note: To receive push notifications with the HoneyPi Android app, you need at least App version 1.1.
Set up push notifications
To get push notifications on your phone, the following steps are necessary:
Step 1: Log in with your ThingSpeak account: https://thingspeak.com/login
Step 2: Click Apps > ThingHTTP > New ThingHTTP. The following fields should be configured:
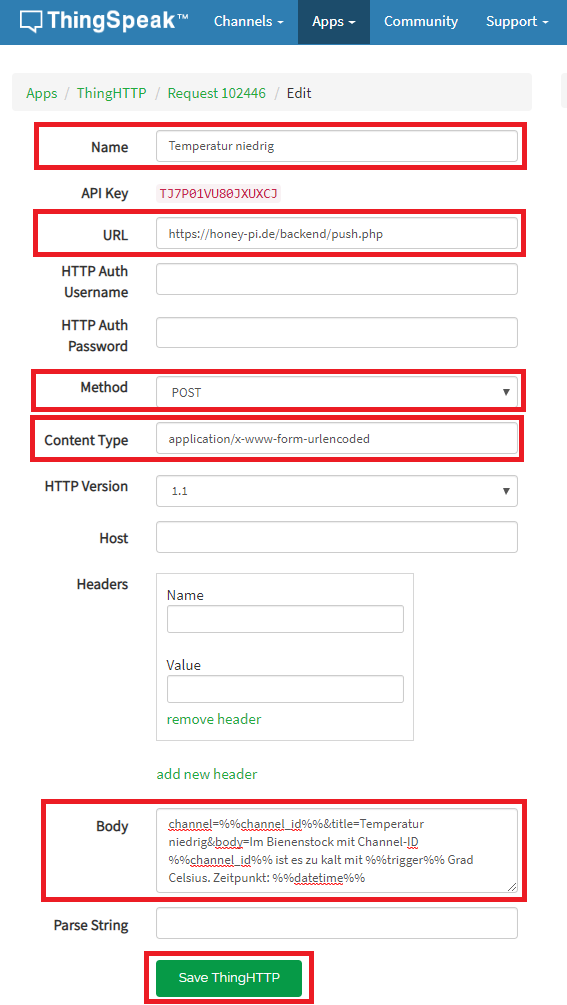
- Name: Enter any name
- URL: https://honey-pi.de/backend/push.php
- Method: POST
- Content Type: application/x-www-form-urlencoded
- Body: The request body, which must consist of the following three parts. The three parameter parts are linked with &-characters, as is usual for URLs:
- channel: Channel ID for which the notification is to be sent. The variable %channel_id% can also be used here, which automatically inserts the ID of the channel for which this ThingHTTP entry is used. For more information about the variables, see here.
- title: Title of your push notification on the smartphone. If only “title=” is specified, i.e. an empty title, then “HoneyPi” is used as the title.
- body: Text of your push notification on the smartphone, e.g. “channel=%%channel_id%%&title=Temperature low &body=In the hive with channel-ID %%channel_id%% it is too cold with %%trigger%% degrees celsius. Time stamp: %%datetime%%”.
- Here variables were used again. For example, the triggering measured value (%%trigger%%), the channel ID (%%channel_id%%) or the time (%%datetime%%) can be given dynamically.
Finally save the ThingHTTP entry via the “Save ThingHTTP” button.
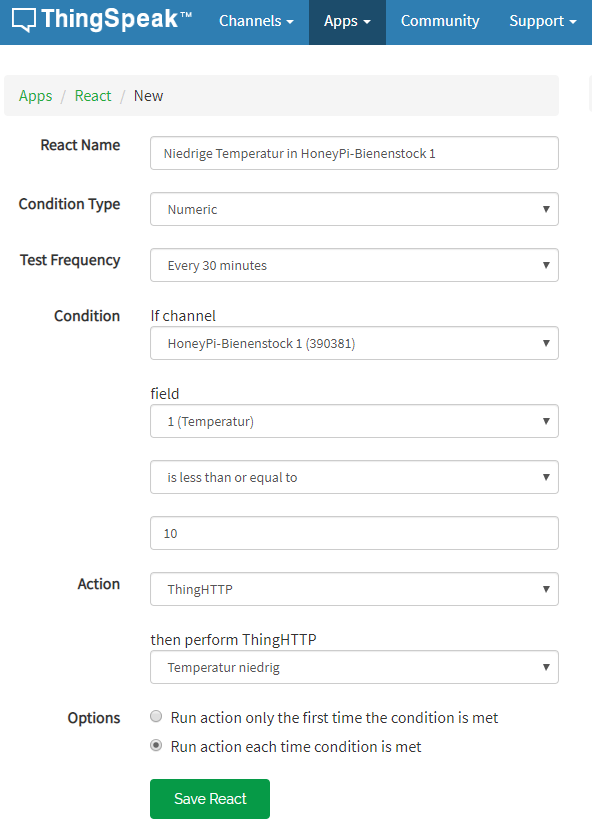
Step 3: Click Apps > React > New React. The following fields should be configured:
- React Name: Enter any name
- Condition Type: Numeric
- Test Frequency: Check the measured values while writing or every 10, 30 or 60 minutes. It is better to select every 10, 30 or 60 minutes, as the push notifications also appear every minute on the smartphone at a measurement interval of one minute, for example.
- Condition:
- If channel: Select the desired channel for whose field the notification is to be sent.
- field: Select the ThingSpeak field for which the notification should be sent.
- Selection of the condition, e.g. is less than or equal to
- Measured value from which the condition is to take effect
- Action: Select ThingHTTP
- then perform ThingHTTP: Selecting ThingHTTP created in step 2
- Options: As a rule, “Run action each time condition is met” can be selected here if the notification is to be sent every time the measured value corresponds to the condition.
Finally save the React with the “Save React” button.
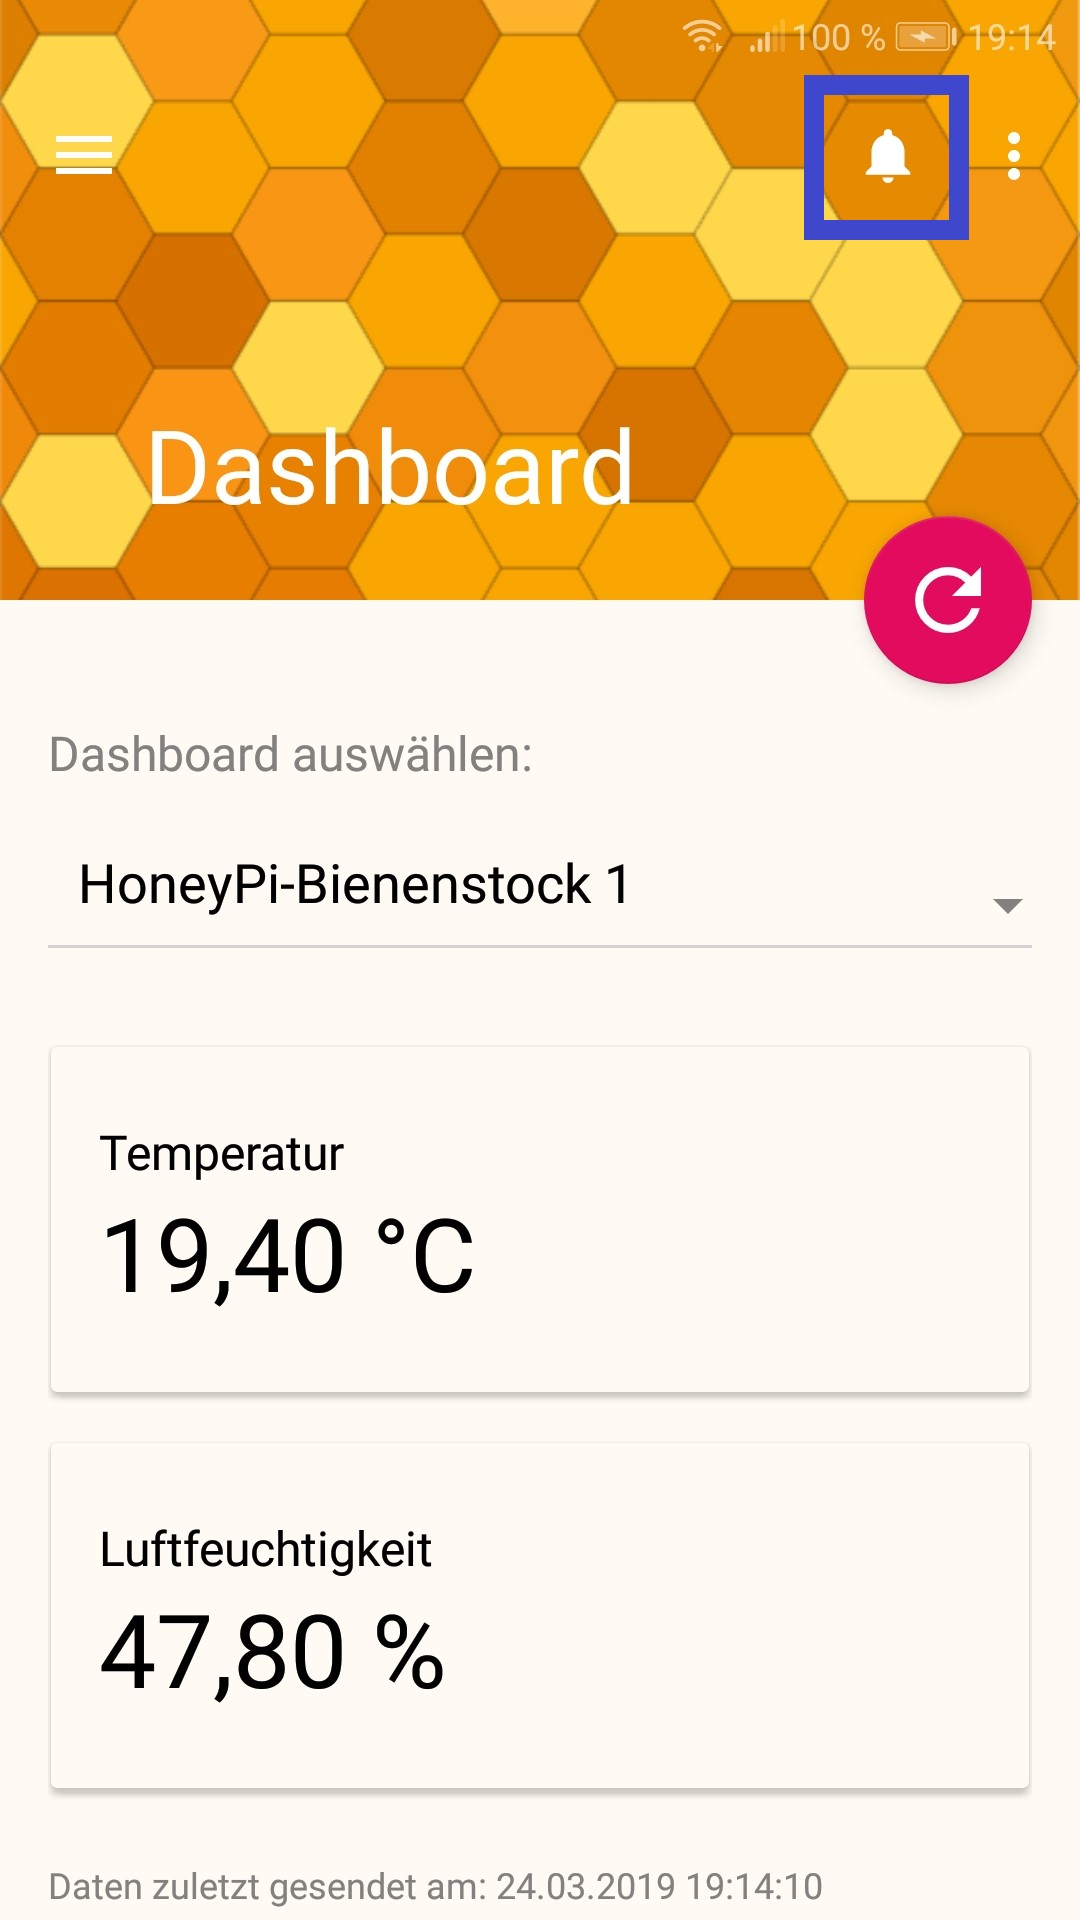
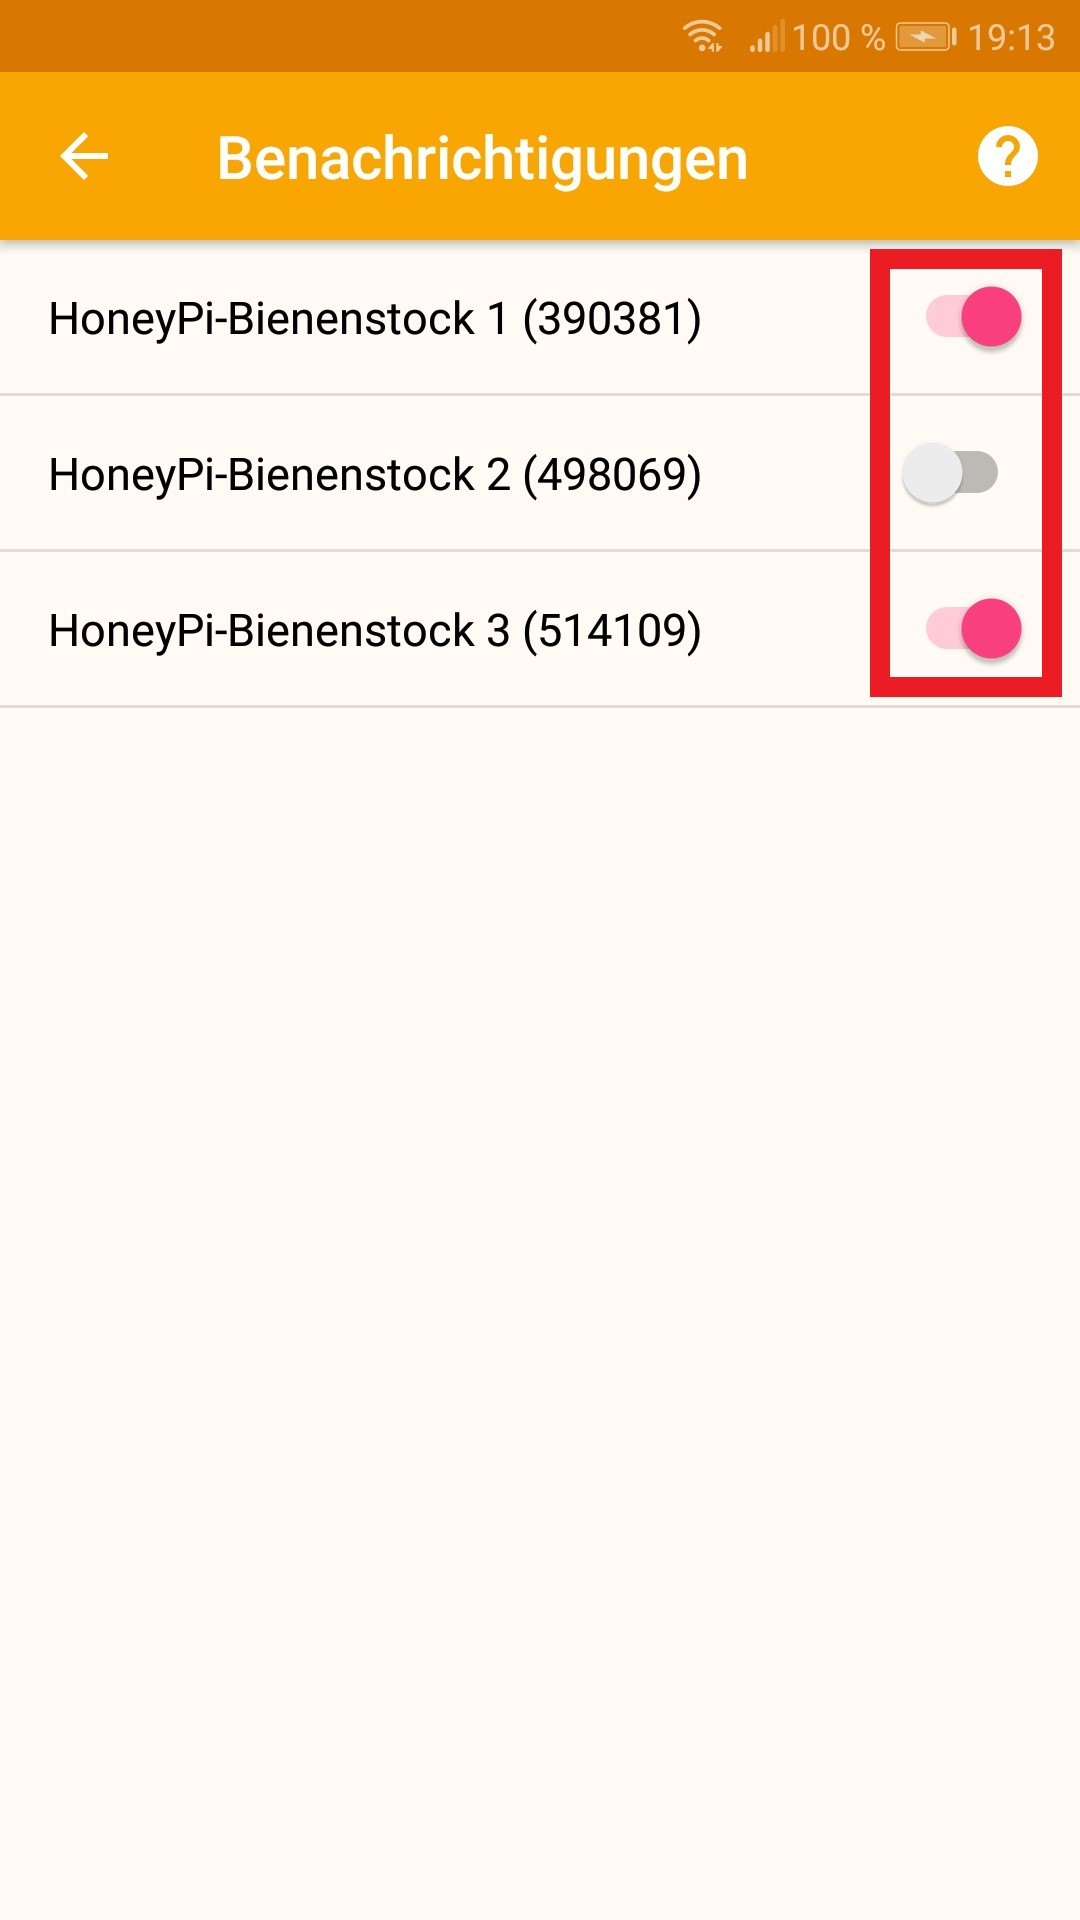
Step 4: Enable notifications in the HoneyPi-Android app: Simply click on the Notifications icon and on the next page enable/disable the channels for which you want to receive notifications.
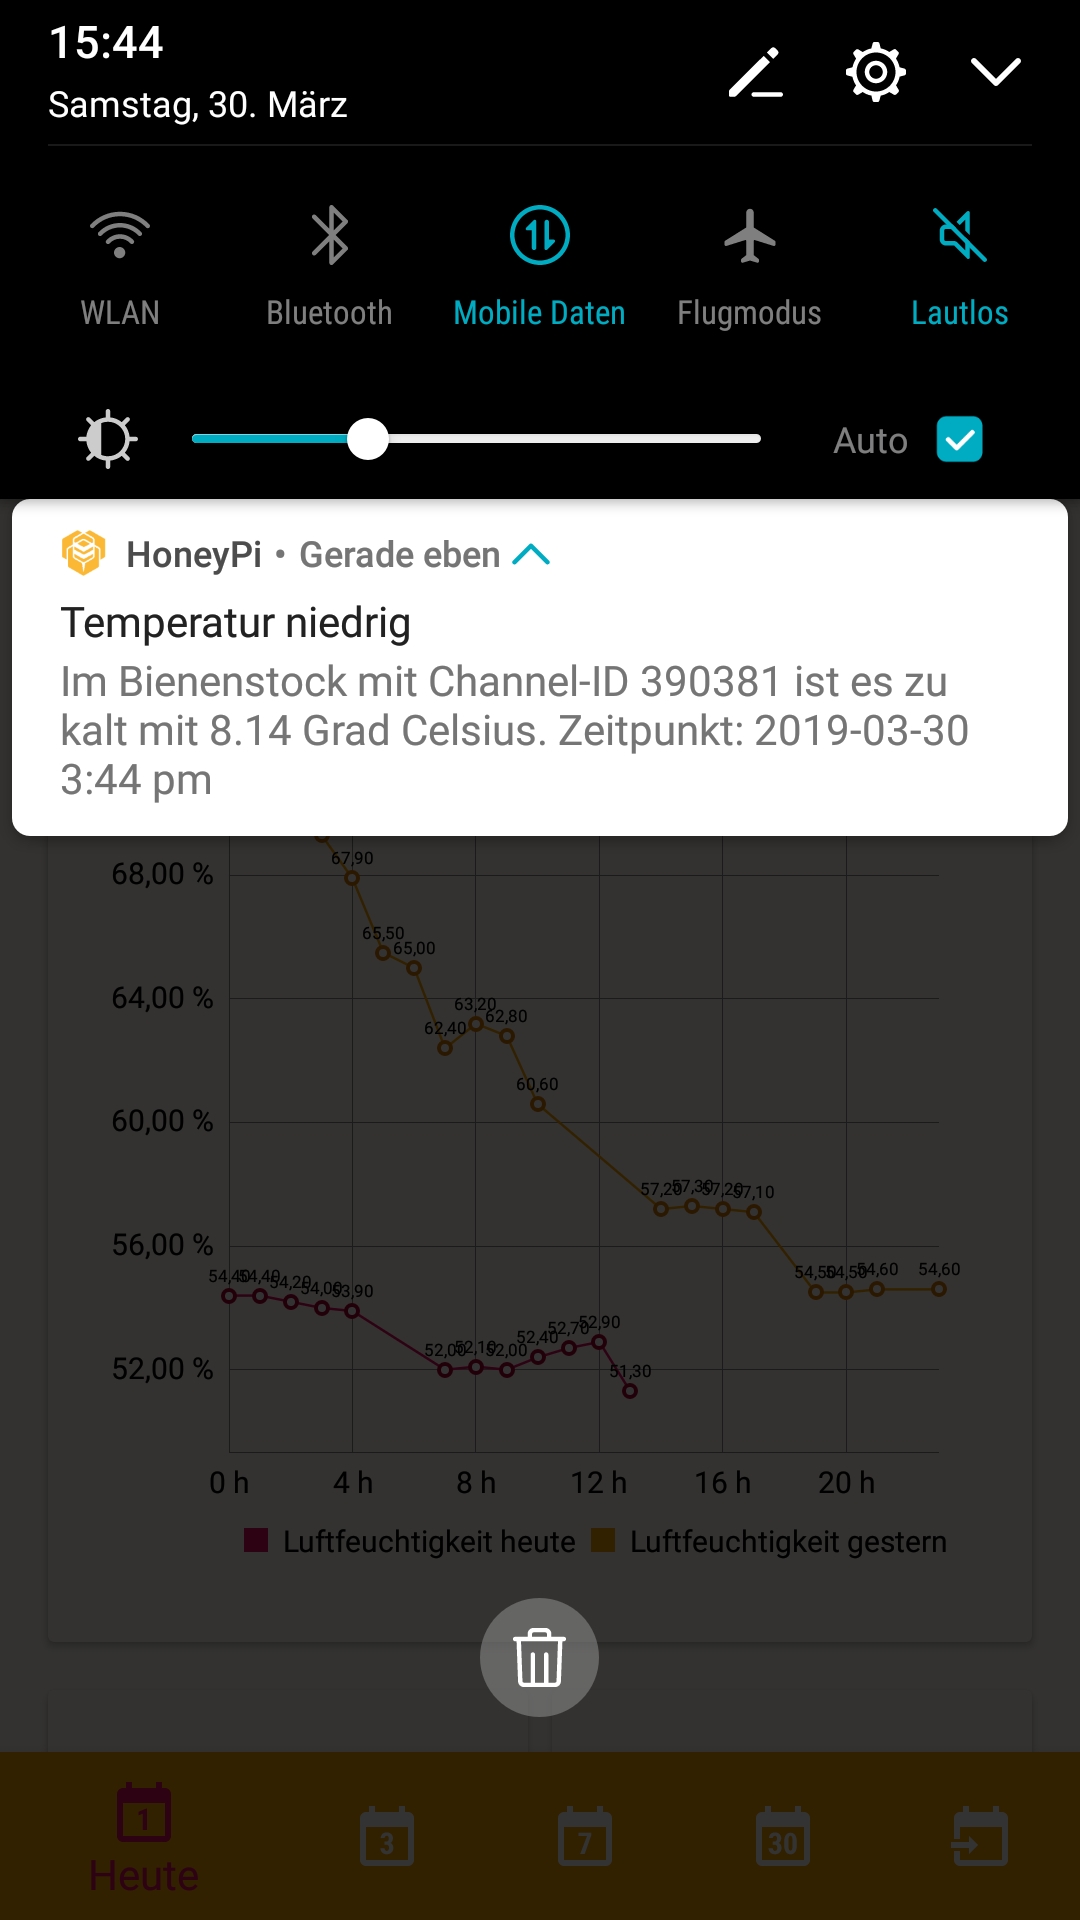
If everything is configured correctly, the push notifications on your phone should look like the picture below:
Reuse ThingHTTP
As described above you have to create a ThingHTTP and a React on your smartphone to get a notification. You have to create a React for each desired notification (= ThingSpeak-Field), because it has to be selected there.
But you can reuse a ThingHTTP for as many fields as you like, because the same ThingHTTP can be selected in as many reactions as you like. For example, you can create a ThingHTTP for too low a temperature and a ThingHTTP for too high a temperature. These two ThingHTTPs can now be used in several channels for temperature monitoring.
Translated 19.10.2019 by JK

Hallo zusammen,
Meine 6 HoneyPi Waagen funktionieren seit 3 Jahren tadellos – jedoch: Ich habe es immer noch nicht geschafft, den Schwarmalarm einzurichten – trotz Hilfestellungen von Melissa. Wäre hier in der comunity jemand bereit, mir bei der Einrichtung zu helfen?
Hier noch ein paar Dinge, die du nochmal prüfen könntest:
– Die Benachrichtigungen sollten für die HoneyPi App in den Android-Systemeinstellungen zugelassen sein
– In der HoneyPi App muss für den jeweiligen Channel die Benachrichtigung aktiviert sein
– Überprüfe nochmal, dass dein ThingHTTP Eintrag wie in der Anleitung ausgefüllt ist:
– URL:
https://honey-pi.de/backend/push.php– Method:
POST– Content Type:
application/x-www-form-urlencoded– Body: Muss Parameter channel, title und body im Text haben, die mit &-Zeichen aneinander gereiht sind z.B.
channel=%%channel_id%%&title=Temperatur niedrig&body=Im Bienenstock ist es zu kalt– Überprüfe deinen React Eintrag, ob der richtige Channel, Field und ThingHTTP ausgewählt ist und ob die Condition stimmt z.B. Messwert unterschreitet einen bestimmten Schwellenwert. Außerdem ist wichtig, ob die Action einmalig oder bei jedem neuen Wert ausgeführt werden soll, was bei den Options deines Reacts eingestellt werden kann.
– Prüfe, ob auch Messwerte in das angegebene Field des Channels gesendet werden, die die Condition auslösen
Danke Melissa, deine Hilfe greift schon so weit. Aber meine Probleme sind ganz am Anfang in thingspeak. Hierbei sollte ich von einem comunity Mitglied Hilfestellung haben. Ich finde keine grundlegenden Hinweise, wie man beginnt.
lg Andre
Nachdem ich jetzt den HoneyPi stabil im Testbetrieb am laufen habe, möchte ich auch die Push-Benachrichtigungen ausprobieren. Allerdings kommt auf dem Smartphone nichts an. Berechtigungen in der App sind freigegeben, App ist die aktuellste Version und Pro ist am laufen.
Ist die Anleitung oben noch aktuell, oder funktioniert das inzwischen nicht mehr? Die IFTTT Variante funktioniert übrigens auch nicht mehr und sollte evtl. entfernt werden. Scheinbar hat IFTTT sehr viel geändert.
Hallo Jochen, hast du auch in den Systemeinstellungen bei der HoneyPi App die Berechtigung zur Benachrichtigung aktiviert? Das muss seit Android 13 zusätzlich gemacht werden. Diese findest du in den Einstellungen deines Smartphones > Benachrichtigungen und Statusleiste > HoneyPi App > aktivieren. Die Bezeichnungen können evtl. auf deinem Handy abweichen.
Ja, die Benachrichtigungen sind auch in den Android Systemeinstellungen für die HoneyPi App freigegeben.
Gerade nochmals alles nachkontrolliert. Jede erdenkliche Benachrichtung für die HoneyPi App in den Systemeinstellungen ist freigegeben.
Da die Benachrichtigung gerade in meinem Test funktioniert hat, kann ich nur noch vorschlagen, dass du auf ThingSpeak dein React und ThingHTTP Eintrag nochmal prüfst. Beim ThingHTTP ist vor allem als URL https://honey-pi.de/backend/push.php und der Body wichtig. Hier muss channel und body gesetzt sein. Es dürfen keine Leerzeichen zwischen den &-Zeichen sein. Versuche es am besten Mal zum Testen mit folgendem Body:
channel=%%channel_id%%&title=Test&body=Test Benachrichtigung für Channel %%channel_id%%
Ich habe es jetzt nochmals alles kontrolliert. Alles richtig eingetragen. Jetzt habe ich den React und ThingHTTP nochmals neu angelegt und jetzt scheint es zu funktionieren.
Vielen Dank
Hallo,
ich habe probleme mit dem Schwarm Alarm, der hat jetzt 2 Jahre supper funktioniert. Eigentlich sollte man doch manuel den ThingHTTP im browser auslösen können? Wenn ich das mache kommt die meldung
Fehler in den Parametern. Bitte überprüfe die Parameter..
Wo könnte hier das Problem sein?
Gruess Patrick
Vielen Dank für eure Mühe! Ich verstehe so Einiges nicht an dem Code, darf ich hier kurz nachfragen?
% ///////////////////////// Code ///////////////////////////////
%Schwarmalarm%
readChannelID = Hier kommt meine Channel ID rein, ist mir klar;
readAPIKey = ‚auch klar‘;
readField = auch klar;
writeChannelID = was kommt hier rein??;
writeField = das verstehe ich auch nicht;
writeAPIKey = ‚auch klar – ist wie „readAPIKey“ gegeben‘;
Hi Andre,
writeChannelID, writeField und writeAPIKey sind die Werte von einem weiteren Channel, in den die Ergebnisse der Berechnung mit der Funktion “thingSpeakWrite” geschrieben werden. Du findest diese IDs/Keys ebenfalls in den Channel Einstellungen des ThingSpeak Channels.
Hallo Melissa, vielen Dank für den Hinweis, muss ich diesen neuen channel selbst erstellen? Ich finde dazu nirgendwo einen Hinweis.
Lg Andre
Hi Andre, ich vermute, du beziehst dich auf den Kommentar von Robert? Ich habe seinen Code leider nicht getestet, aber du musst den Channel auf jeden Fall anlegen. In seinem Code wird eine if-else-Bedingung (
L+SchwarmAlarmGewicht<=ZL) gemacht und entweder 0 oder 1 in diesen neuen Channel geschrieben. Im ThingSpeak React kannst du dann den neuen Channel hinterlegen und bei 0 bzw. 1 die Benachrichtigung senden. Die Bedingung, bei der ein Schwarmalarm gesendet werden soll, kannst du ja dann nach Bedarf anpassen.Hallo Melissa!
Vielen Dank für deine Mühe! Langsam dämmerts, aber ich möchte doch noch nachfragen, wo es fundierte Anlaufstellen/ Hilfen/ Anleitungen/ Tutorials zu Thingspeak gibt. Diese Materie ist schwer zu finden. Neuen Channel anlegen ist ja klar, React habe ich unter Apps gefunden, aber wie das alles geht und funktioniert, …
Was mich wundert: Schwarmalarm ist sehr wichtig und man findet recht wenig Reaktionen der user.
lg Andre
Hallo Andre, zum Thema Schwarmalarm haben wir nur die Anleitung aus diesem Beitrag. Du kannst dir eine Benachrichtigung aufs Handy senden lassen, wenn der Messwert den angegebenen Schwellenwert unter-oder überschreitet. Der Code aus dem Kommentaren stammt nicht von mir und ich kann deshalb nicht beurteilen, ob er korrekt ist und funktioniert.
Für allgemeine Infos zu ThingSpeak, wirst du evtl. in deren Help Center fündig: https://de.mathworks.com/help/thingspeak/getting-started-with-thingspeak.html
Bei Fragen, kannst du dich auch ans ThingSpeak Forum wenden: https://de.mathworks.com/matlabcentral/topics/thingspeak.html
Liebe Melissa, lieber Robert,
ich habe mich nun auch mal an den Zeit- und gewichtsabhängigen Schwarmalarm gewagt. Ich habe dabei sowohl Roberts Code vom 11.Mai 2021 mit fixen Werten (x kg Differenz zwischen der aktuellen und der Vorletzten Messung), als auch den mit prozentualer Gewichtung (-20% Gewicht in den letzten 20 Minuten) erstellt und werde mal schauen, wie die sich verhalten. An dieser Stelle schonmal großen Dank!
Warum gibt es den Hinweis, dass man nicht weniger als 20 Minuten als zu untersuchende Zeitspanne eingeben soll. Hat das technische Gründe? Weil für einen Schwarmalarm hätte ich gerne einen möglichst kleinen Bereich, eher so 1% Gewichtsverlust in der letzten 1 Minute.
In dem Zusammenhang auch die Frage nach dem Sinn des TimeControll. In anderen Triggerwarnungen (Temperatur/Gewicht etc.) hatte ich bisher keine TimeControll. Der soll mich halt jedes mal warnen, wenn bestimmte Werte erreicht werden, hier die Values 1 oder 0.
Jetzt, wo ich beide Varianten laufen habe, und es so langsam verstehe merke ich auch, dass wohl eine Mischung aus beiden Ansätze geschickt wäre. Fester Wert für den Verlust (z.B. 300 Gramm) in der letzten Minute. so habe ich unabhängig von der Anzahl an Honigräumen o.ä. immer das tatsächliche Gewicht eines Schwarms als Trigger und statt “NumLastMeasuredValues = 2” lieber einen Zeitraum (auch auf die Gefahr hin, dass sich in dieser Zeit die Werte nicht geändert hatten – ich glaube das ist unproblematisch).
Hallo Jan,
bin gerade über dein Schwarmalarm Posting gestolpert. Hast du bereits Erfahrungen aus deinen Ideen? Hast du mitunter einen Code zum testen?
Danke!
lg
Manfred
Schwarmalarm aus Vergleich akt. Wert zum vorletzten Messwert .
Mit der Hilfestellung von Melissa habe ich nun den Alarm hingekriegt.
Vielen Dank
Gruss
Robert
% ///////////////////////// Code ///////////////////////////////
%Schwarmalarm%
readChannelID = 1097XXX;
readAPIKey = ‘7OFQP64TGB09WXXX’;
readField = 4;
writeChannelID = 1376XXX;
writeField = 8;
writeAPIKey = ‘7YFC6X1XNV704XXX’;
NumLastMeasuredValues = 2;
SchwarmAlarmGewicht = 1.5
% Letzte Messung = L
% 2.letzte Messung = ZL
% Schwarmgewicht = (ZL – L)
%% Read Data %%
data = thingSpeakRead(readChannelID,’Fields’,readField,’NumPoints’,NumLastMeasuredValues);
L = data(2)
ZL = data (1)
Schwarmgewicht = ZL -L
if L+SchwarmAlarmGewicht<=ZL
thingSpeakWrite(writeChannelID,'Fields',writeField,'Values',[1],'WriteKey',writeAPIKey);
else
thingSpeakWrite(writeChannelID,'Fields',writeField,'Values',[0],'WriteKey',writeAPIKey);
end
Hallo Robert
ich habe deinen code kopiert und all meine daten eingetragen.
ich kriege aber immer diese fehlermeldung
SchwarmAlarmGewicht =
1.5000
Error using Volk 9
‘Fields’ value must be a scalar or a 1-by-n numeric vector of positive integers with values between 1 and 8.
habe bei readField = 6; und writeField = 6; diese werte geschrieben.
worin könnte der fehler bestehen?
gruess patrick
Hallo Javan,
Danke für deine rasche Antwort und deinen link.
Ich werde mir das anschauen bzw. versuchen es umzusetzen, bin leider im dieser Art der Programmierung nicht so zu Hause.
Übrigens ich find euer honeypi Projekt super !
Schöne Grüße
Alfred
Hallo Melissa,
Ist es möglich einen Schwarmalarm nicht mit einem fixen Grenzwert, sondern mit einen Vergleich akt. Wert zum vorletzten Messwert auszuführen ?
Dies würde meiner Meinung nach ein ständiges Anpassen des Grenzwertes ersparen.
LG
Alfred
Hallo Alfred,
das geht aber ist etwas komplizierter umzusetzen. Bei ThingSpeak kann man out of the box absolute Werte für die Benachrichtung einstellen. Es geht aber auch sowas wie 10% Gewichtsabweichung.
Wir hatten hier diese veraltete Anleitung bereitgestellt: https://docs.google.com/document/d/1NUo_w4SJPpncgfs40p4jhjbCXaTYxnRLSRjjhcUEFPA/edit?usp=sharing Kannst du diese nutzen und gegebenenfalls für uns anpassen?
Vielen Dank und Grüße
Javan
Hallo Javan
ich habe nach dieser Anleitung https://docs.google.com/document/d/1NUo_w4SJPpncgfs40p4jhjbCXaTYxnRLSRjjhcUEFPA/edit?usp=sharing
versucht einen Schwarmalarm hinzukriegen. Channel ID,und Read API Key und Write API Key sind ok.
Aber es erscheint immer dieser Fehler:
“Index exceeds the number of array elements (1).
Error in Gewicht Schwarmalarm Mattlischwand (line 11)
if data(1)*0.8>data(3)”
Ich wäre froh um Hilfe
Vielen Dank und freundliche Grüsse
Robert
Hallo Robert,
die Fehlermeldung sagt aus, dass das field3, welches zu in data(3) aufrufst nicht existiert.
Die Zeile musst du anpassen, je nachdem in welchem Feld (field1, field2…) du das Gewicht abgespeichert hast.
Viele Grüße
Hallo Javan
Vielen dank für die rasche Antwort.
Den Fehler :
“Index exceeds the number of array elements (1).
Error in Gewicht Schwarmalarm Mattlischwand (line 12) ”
bringe ich nicht weg.
Leider checke ich Funktion anscheinend nicht.
Meine Interpretation:
Ich lese Field 4 (data(4)) , schreibe in Field 8 eine eins wenn data(1)*0.8>data(4) sonst eine null.
Was, oder woher ist data(1) ?
Hier ist der ganze Code:
readChannelID = 1097XXX;
readAPIKey = ‘7OFQP64TGB09XXXX’;
readField = 4;
writeChannelID = 1376XXX;
writeField = 8;
writeAPIKey = ‘7YFC6X1XNV70XXXX’;
timespace = 20;
%% Read Data %%
data = thingSpeakRead(readChannelID,’Fields’,readField,’NumMinutes’,timespace);
if data(1)*0.8>data(4)
thingSpeakWrite(writeChannelID,’Fields’,writeField,’Values’,[4],’WriteKey’,writeAPIKey);
else
thingSpeakWrite(writeChannelID,’Fields’,writeField,’Values’,[0],’WriteKey’,writeAPIKey);
end
Bitte um Hilfe
Vielen Dank und Gruss
Robert
Hallo Robert,
dein data Array (Liste an Messwerten) scheint leer zu sein und deshalb kommt ein Fehler beim Zugriff auf
data(1), was bedeutet, dass auf das 2. Element (in der Informatik wird immer mit null angefangen zu zählen) nicht zugriffen werden kann, da es nicht existiert. Das gleiche würde auch beidata(4)(5. Element) passieren, aber das Programm ist vorher schon abgestürzt.dataist eine Variable, die das Ergebnis der FunktionthingSpeakReadspeichert, die eine Liste an Messdaten zurückgibt. Hier findest du die Doku: https://de.mathworks.com/help/thingspeak/thingspeakread.htmlDein Aufruf
data = thingSpeakRead(readChannelID,'Fields',readField,'NumMinutes',timespace);bedeutet dann, dass aus deinem Channel mit IDreadChannelIDaus dem FeldreadFielddie Daten der letzentimespace(20) Minuten ausgelesen werden. Ich vermute einfach, dass du in den letzen 20 Minuten keine Daten gesendet hast und deshalb der data Array leer ist und deshalb der Fehler kommt.Vielleicht kannst du dein Programm so umschreiben, dass es nicht die Daten der letzen 20 Minuten, sondern die zuletzt gesendeten x Messdaten nimmt. Laut der oben verlinkten Doku sollte das mit dem Input Argument
NumPointsgehen.Edit: Ich habe dir deine Keys und IDs ein bisschen zensiert, damit diese nicht offen im Internet zu lesen sind 😉
Gruß
Melissa
Hallo Melissa,
vorab soviel: ich habe eine Bienenstockwaage gebaut (HoneyPi-Projekt), ein ThingSpeak-Konto eingerichtet, wo ich 5 Sensoren abfrage: Gewicht, Außentemperatur, -Luftfeuchtigkeit, Temperatur Brutraum + Batteriespannung.
Dann habe ich nach Ihrem Beispiel bei “meinem” ThingSpeak” eine Testabfrage “Aupßentemperatur zu hoch” erstellt und extra HoneyPi PRO abboniert. Es funktioniert alles bis auf den letzten Schritt gemäß Ihrer Dokumentation: BENACHRICHTIGUNG AUF DEM SMARTPHONE, d.h. dieses Bild kann ich bei mir nicht sehen.
Auf meinem Handy (Huawei nova 5T) ist in der schmalen Statusleiste das HoneyPi-Symbol. Ziehe ich dann die Statusleiste nach unten, kann ich folgendes sehen:
————————————————————–
HoneyPi 16:00
Außentemperatur
in H… Bienenstock mit Channel-Id 1234567…
——————————————————————–
Aber in meinem “Body” steht ja noch weiterer Text/Infos, die nicht angezeigt werden.
Wie bekomme ich die Push-Benachrichtigung korrekt + zeitnah angezeigt?
Können Sie mir einen Tipp geben? Vielen Dank.
Mit freundlichem Gruß
Karl
Hallo Karl,
Android zeigt die Benachrichtigungen immer eingeklappt an, deshalb siehst du nur einen Teil deiner Nachricht. Normalerweise sollte bei der Benachrichtigung ein kleines “Pfeil/Dach nach unten” Icon sein, mit dem man aufklappen kann und den vollen Text anzeigen kann. Das habe ich auch für den Screenshot von oben gemacht. Falls dein Handy dieses Icon jedoch nicht anzeigt, musst du deine Benachrichtigung in ThingSpeak auf die Zeichen, die du in deiner Benachrichtigung zur Verfügung hast, kürzen. Z.B. würde ja reichen: 1234567 = 8,14 °C; ZEITSTEMPEL
Gruß Melissa
Hallo Melissa,
vielen Dank für Deine prompte Antwort. Nachdem ich diese gelesen hatte, wurde mir klar, dass ich Deinen Screenshot bisher falsch interpretiert habe. Ich war bisher davon ausgegangen, dass die Nachricht von HoneyPi soooo aussehen muss.
Nach einem erneuten Test ist es auch so wie von Dir beschrieben.
Vielen Dank nochmals für Deine Mühe.
Gruß Karl
Hi, ist diese Funktion nur in der App pro Version verfügbar?
VG Florian
Hi, ja die Benachrichtigungen sind nur in der Pro Version verfügbar.
Über IFTTT (auch eine Anleitung hier verfügbar) oder die iOS-WebApp geht es aber auch ohne die Pro-Variante.
Gruß
Melissa